Making A Game for the E-Reader using NES tools
This post tries to document the many eccentricities M-Tee and I ran into while trying to build a game for the Nintendo E-Reader using tools meant for the NES. My hope is this can help others do what we did, because the E-Reader is a fun peripheral!
Dizzy Sheep Disaster: EX is coming this year to your e-reader and phone! Check it out here!
What is the E-Reader?
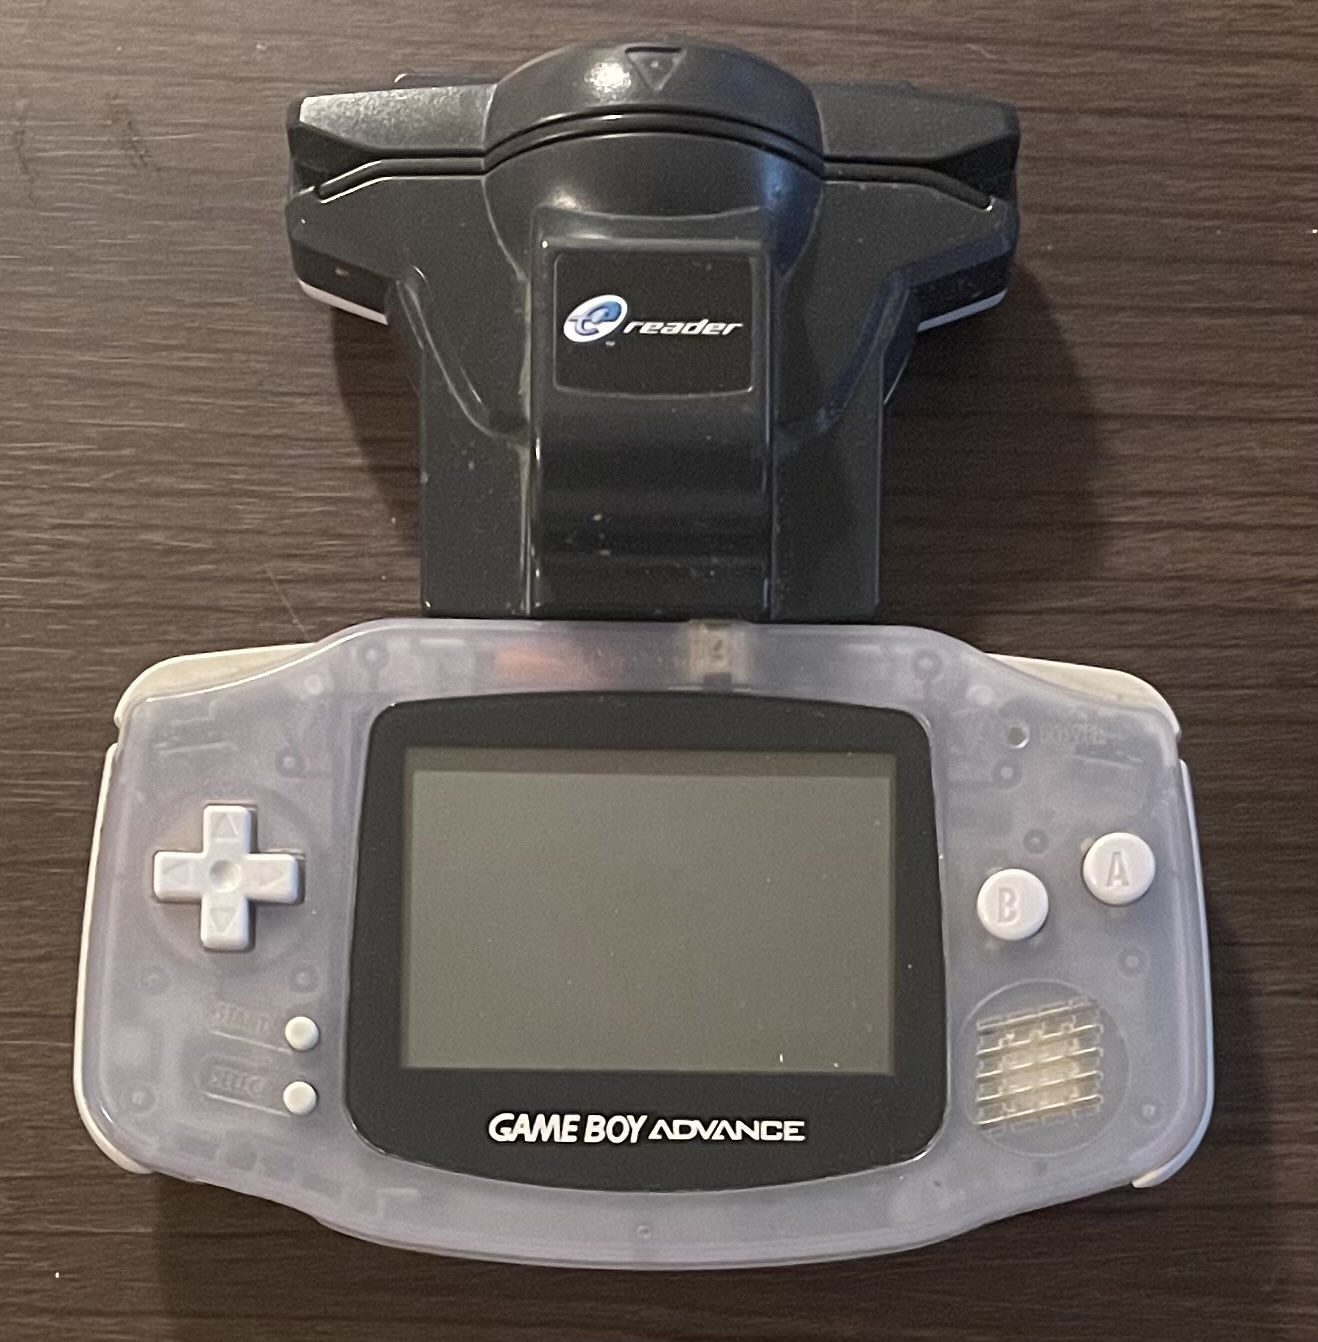
The E-Reader was a relatively short-lived device made for the Gameboy Advance – it allowed you to scan physical trading cards with your GBA. Scanning cards allows you to unlock things like new levels in Super Mario Advance 4, or new items in Animal Crossing. The E-Reader can also scan cards to play games, such as those on some Pokemon cards of the era, a very limited number of Game and Watch games, or some classic NES games. That’s where this project comes in – since the console’s release some very smart people have built tools around this platform, enabling custom cards!
After discovering this, I started work on creating my own game using my knowledge and skills from years of hacking on NES games. After getting some of the basics down, I was able to bring on the ever-talented M-Tee to help shape the design and provide amazing graphics. The result is Dizzy Sheep Disaster: DX, an upcoming full game for the E-Reader!
Read on to learn some of the strange things we found out.
Choosing which way to make a game
If you want to make something for the e-reader, you’ve got options! The E-Reader has a full-fledged NES emulator on it, which is what this guide focuses on building for. As you will learn as you read this guide, this emulator is very quirky, but it works!
If you’d rather write something targeting the console directly, I strongly suggest reading Matt Greer’s blog posts on using z80. He delves into much detail, and helps explain some of the API functions detailed in some of the older documentation. This has a steeper learning curve, but opens many new possibilities.
A third option that hasn’t been as thoroughly explored is creating a GBA executable, which can be run on its own on the console. Nintendo largely used the z80 option for their E-Reader cards, based on older documentation.
As this guide is about using NES tools, here are some pros and cons to writing NES games for the e-reader
Pros
- A huge wealth of NES development tools are available for use
- There are tons of guides on how to make a NES game
- Code can be written in C or ASM, and tested readily and easily using NES emulators (Though you should test on e-reader early!)
- Clear requirements and APIs
Cons
- Extremely constrained storage
- Weird graphical quirks
- Sound emulation is quirky
- No way to interact with e-reader specific APIs
NES Emulator Limitations
The e-reader NES emulator has a number of restrictions to be aware of, some of which will be covered in this document in more detail. As a NES dev, at a high level here is what you need to know:
- Mapper 0 (nrom) is the only supported mapper
- Roms must have exactly one 16kb code bank, and one 8kb chr rom bank. (Half the size of micro mages!)
- The screen width and height are restricted significantly, simulating a tv with significant overscan
- Scanlines are interpolated at certain points, causing (solveable) flicker
- Color palette is different to the NES, and varies by console (gba, sp, gameboy player, etc)
- Color emphasis bits are not supported
- The 8 sprites per scanline limitation is removed (Thanks >Dr. Ludos for pointing this out!)
- No (known) way to interact with any e-reader specific APIs
On Graphics
The e-reader is very peculiar with how it implements the NES emulator. The biggest quirk is the screen resolution – the NES has a resolution of 256×240 visible, with some screens cutting off part of this. The GBA has a resolution of just 240×160, which is quite different. – the horizontal resolution is 16px off, but the vertical resolution is only ⅔ that of the NES.
The e-reader emulator solves the horizontal resolution problem by behaving like a particularly quirky TV from the era, and cuts about 8 pixels off from each side – they just aren’t drawn. Due to the screens NES games were traditionally designed for, this tends to not affect things much.
The vertical resolution is much more interesting – in addition to cropping, the emulator uses interpolation to flicker between multiple rows of pixels, creating the illusion of a full screen. Early Nintendo titles often had repeating pixels, which helped make the games Nintendo chose look better.
Backgrounds
To reduce the NES’ signal resolution of 256×240 to the GBA’s 240×160, the e-Reader emulator performs a combination of cropping the image, interpolating certain rows of background pixels, and applying special rules to sprites.
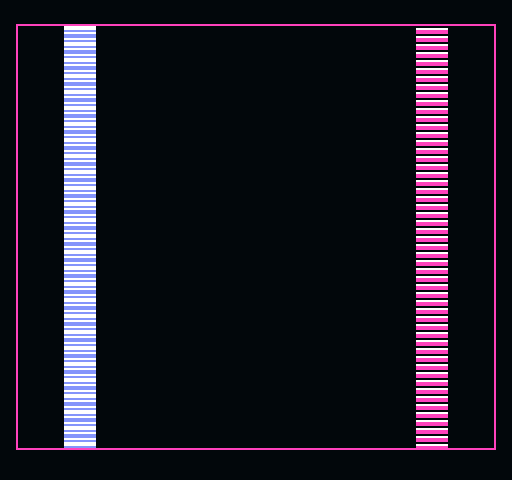
A raw NES nametable (image scaled 200 percent)
The pink rectangle marks the outermost visible pixels on the GBA screen. The pink column on the right illustrates the interpolation method used. The blue column on the left illustrates a potential workaround to avoid background flicker when developing an NES game for e-Reader use.
Cropping
The e-Reader emulator crops the following:
- Left: 8 pixels
- Right: 8 pixels
- Top: 12 pixels
- Bottom: 15 pixels
Interpolation
On every other frame, the e-Reader omits one out of every three rows of background pixels. It alternates which rows get omitted on every other frame (alternating between rows 2 or 3 and rows 6 or 7, out of every 8-pixel tall background tile).
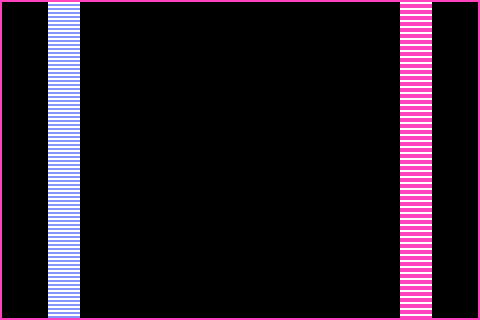
Alternating frames of interpolation, while displaying the same nametable as above
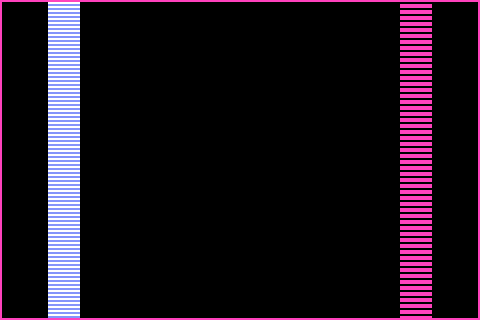
Note in the above images that on one frame, all the black lines (within the pink column) are omitted. But on the other frame, all the white lines are. None of the pink lines are omitted at any point in time. This alternation is responsible for the jittering/flickering e-Reader NES titles are known for. But it can be worked around.
Avoiding Flicker
Notice also in the above images that the blue column never changes; it is always a steady pattern of blue and white stripes. To achieve this, we ensured that rows 2 and 3 of the background tiles were identical; as well as rows 6 and 7. Therefore, even though alternating rows of pixels are being displayed, those rows are identical in both frames of interpolation, resulting in a steady, constant image. To achieve the same, you’ll want to think of your background tiles as 8×6 while designing them, and then duplicate the respective rows (second and second-to-last) of pixels.
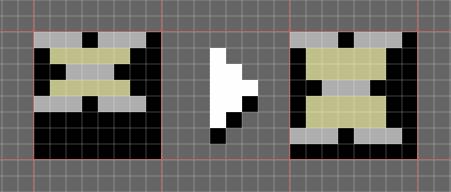
A letter from our font, as designed and as shown on the console on the left, and after being processed for insertion into our CHR data on the right. The duplicated rows have been highlighted in yellow. The end result displays on the GBA exactly as designed.
Note that this trick only works when the ppu is scrolled to a multiple of 8 on the y axis. When the scroll is set between tiles, the duplicated rows will move, and flicker will return.
For the sprite layer, the overlap is a bit different. Sprites that are only 8 pixels high will not see any major change. They will cover 8 GBA pixels, so they may seem slightly taller than normal (relative to the background).
For metasprites that are two or more hardware sprites tall, the bottom two rows of a hardware sprite that touches another hardware sprite will be interlaced with the top two rows of that second hardware sprite. To avoid flicker we can duplicate the last two lines of one hardware sprite onto top two lines of the sprite below it.
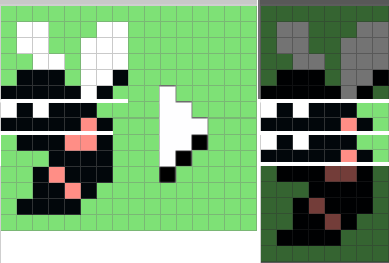
Here is one of the sprites in the game with how it was originally designed on the left, and the way it is duplicated into CHR on the right. The non-duplicated rows have been darkened to make this change clearer.
It’s also worth noting that sprites in the emulator do not follow the 8 sprites per scanline rule, as discovered by Dr Ludos, so you can have as many sprites on a scanline as you want! This opens the doors to some pretty unique sprite designs. (Though you won’t be able to test in all emulators)
Color Palette
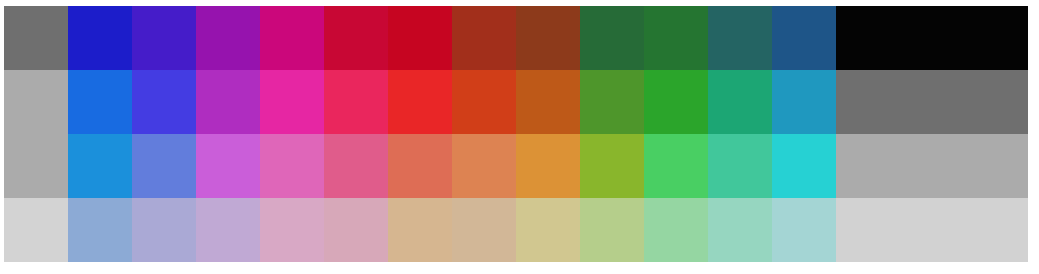
The color palette on the e-reader emulator is interesting, to say the least. The color palette used seems to vary wildly based on the console it is used with. Emulation done with mgba is also a bit different. A few example palettes are attached here for your reference. Color choice is a little tough based on this.
These palettes were generated by a tool that takes in an image and blocks of pixel locations, then averages the color across each of the blocks. A specialized rom that shows large blocks of colors is used with screenshots or photos to capture all possible colors. These images are then run through the tool, which produces an html page showing the palette, and a list of html color codes. The resulting palette and color codes are shared below.
This is the palette used by mgba, using the tooling described above: (Palette Entries)

This is one generated using the Gameboy Player on the Gamecube, through capture software (Palette Entries)
This one is generated using photos of an original GBA console, lit as best possible (Palette Entries)

Here’s one from a GBA SP using the backlight in the best lighting I could manage
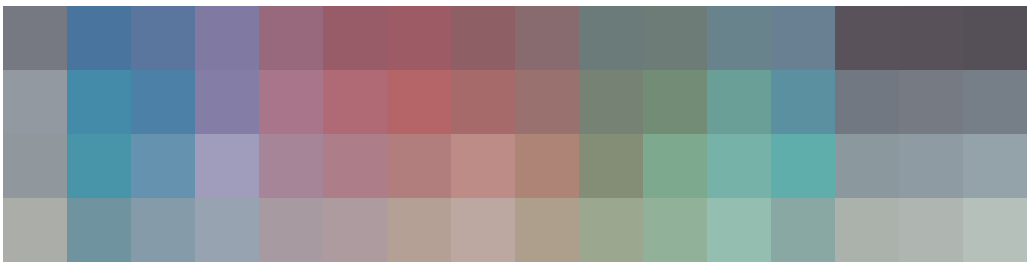
Here’s another without the SP’s backlight (and with external lighting)
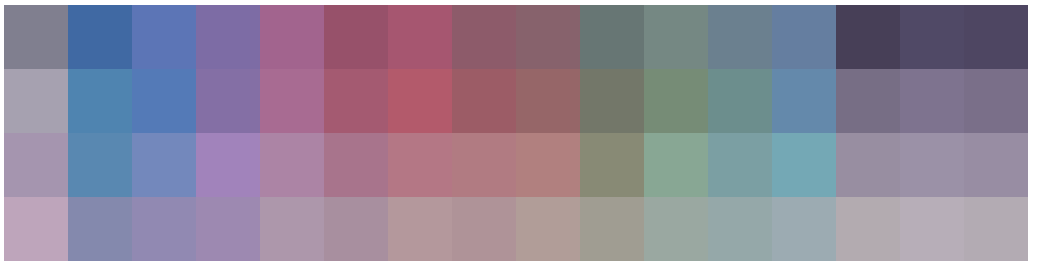
Switching to a backlight in a darkened room provides a slightly warmer palette. (Room lighting may have affected earlier images)

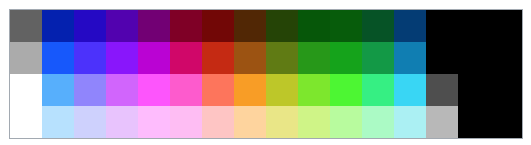
For comparison, here is the default NES palette, gotten from the nesdev wiki
On Sound
The NES emulator on the e-reader has one major quirk with audio, and that’s that it doesn’t handle rest notes used by common libraries correctly. When making music for the NES, generally it’s good enough to set the volume to 0, and this is what libraries like famitone2 and famitracker do by default. The e-reader’s built-in emulator doesn’t understand this.
You can fix that though! You’ll just have to hack the code for your music engine a little bit. If you’re using famitone2 there is sample code below, otherwise you may be able to port it. The trick is, if the volume column is zero, set the high and low APU timer values to zero.
Note: There is probably a better way to do this! I don’t know the NES APU well, and I took the first solution that worked without major side effects.
Sample code for famitone2
Search for the definition of `@ch3cut:` , and replace the code directly below it before the next label with the code below:
@ch3cut:
    ; Triangle fix for weird e-reader NES emulator bug
    cmp #0
    bne @trianglebug
    lda #0
    sta FT_MR_TRI_H
    lda #0
    sta FT_MR_TRI_L
@trianglebug:
Printing Notes
General Tips
- To convert a rom to e-reader format, use `nedcmake` to convert the rom to a number of .raw files
- To get actual images, use `nedcprint`
- pay close attention to the DPI in the tool – your printer needs to support this DPI, and you must print at the same DPI. 600 works consistently for me, 300 is too imprecise
- nedcprint has 1 pixel-wide lines at the edge of cards – use these as your cutting guides
- Plain paper typically doesn’t work, try to use photo paper. Cheap photo paper seems to have worked for this author
- A much better guide has since been written by Matt Greer, and it includes more powerful tools. Go check that out!
Other Resources
- CaitSith2’s tools can be used to convert ROMs to dotcodes and print them
- firefly’s site has documentation on opcodes and APIs
- gbatek has extensive technical documentation for gba and e-reader
- Matt Greer’s blog covers many e-reader topics and more modern tools